 Jordan Pascale
A long time ago, in Metro stations not so far away, riders setting out for their commutes simply had no way of knowing how long they might have to wait for their train.
WMATA understood that was a problem — Former WMATA Board Chair Chris Zimmerman once said that uncertainty is one of the major barriers to transit use.
“It’s not just that you wait, but you don’t know how long you’re going to have to wait,” he told the Washington Post in 2000. “If I have two minutes or 20 minutes until the next train, it makes a difference.”
So — in a fit of Y2K modernity, at the dawn of this century, Metro installed real-time “passenger information displays” on its station platforms, letting riders know when the next train is set to arrive.
Ten years later, Metro started sharing its data with developers so they could create public-facing apps. Today, most people do use apps like Transit, Google Maps or Metro Hero — Metro surveys find that about 60% of Metro riders check those train or bus times before leaving.
But in the past few years, form is catching up to function — some hobbyists want an easier way to monitor Metro train times before they leave their homes, rather than pulling out their phones every few minutes. So they’ve started creating mini-Metro boards that shrink the familiar LED screen down to a home or office-sized installation.
Ken Schneider is one of those people. Back in 2017, he built a mini-board that told him arrival times at the Virginia Square station near his home. He says he built the board as a way to optimize his time.
“You don’t want to have to get there and be like, ‘oh, my God, it’s 15 minutes,'” he said. “So now I’ve got it on my dresser and I can glance over to see if I’ve got to rush or if I can wait a few minutes before I leave.”

He knows exactly how long the walk is to the station and times his arrival perfectly for when a train pulls up.
Schneider got inspiration from Instagram when he saw a mini arrival board for New York. But the company didn’t make a version for D.C. Luckily, Schneider is a software engineer, which gave him a leg up for building his own. He did most of the heavy lifting by programming some of the back-end code over a few weekends. He tried to replicate the actual sign as closely as possible.
“I think you need at least some inclination toward electronics to build one of these things,” Schneider said. His best advice: “Follow the directions… be patient.
“You’re going to run into some sort of roadblock because this isn’t a consumer product (ready to go). Be willing to try things that, you know, may not work. And if you get stuck, just reach out.”
Building Our Own Metro Passenger Information Display
We here at DCist decided to put that sentiment to the test. But before I started the process of creating my own mini Metro board, I did a gut check to figure out if I could pull it off. Here’s how it went for me:
Do I have some inclination for electronics and computers? Yes.
Did I consider it easy? Yes and no.
Did I run into some frustrating roadblocks? Absolutely.
Can I clear up those roadblocks for you? Let’s hope.
Is this a fun project for Metro enthusiasts or families with kids? For sure.
There are several guides out there to build one of these boards.
Schneider’s version not only shows train times but also incident alerts and other Metro info you might only otherwise see inside stations. It is a bit more complicated to build and more expensive because it uses two LED matrix boards and requires a Raspberry Pi, an all-in-one computer chip that usually costs $35 but is decidedly not as cheap and available now thanks to the pandemic-fueled chip shortages. (This reporter is going to give it a try when supply increases and the prices come down).
Other professionally-made versions like Tidbyt will cost you up to $200 while real-time train maps like TrainTrackr will run you about $240.
The version we built cost less than $100. We used this guide from DC-Metro, a developer on Github that we, unfortunately, couldn’t track down for an interview.
View this post on Instagram
//www.instagram.com/embed.js
What you need:
- This $70 LED matrix kit from Adafruit, includes an LED board, a chip to run it, and a power supply
- Phillips head screwdriver
- A computer with text-editing software like Notepad or Text Edit (standard on most machines)
- A USB-C cable or a USB-C to A cable to connect the chip to your computer so you can configure it (you might already have one of these charging cables at home)
- A Wi-Fi network
- A stand or frame (or build your own with some wood and stain) if you want to make it look nicer
- A Wi-Fi-connected plug or another timer (I noticed my board occasionally freezes and this can be set up to restart it every few hours).
How to do it
I’m not going to go step by step — you should follow this guide — but I will give a broad overview of the process and the trouble I ran into. In all, it took me about an hour and a half of troubleshooting through different problems, which I’ll address here.
Assembly
Your board is not ready out of the box, but it is pretty easy to plug in and get going.
- Take the U-hook wires and screws, and screw them into the computer chip. Black goes to GND (ground) and red goes to 5V.
- Insert the chip into the port on the back, left side of the LED board.
- Plug the connector from the black/red wires into the VOC/GND port on the right side. You won’t use the other connector.
- Take your USB-C cord and plug it into the chip and the other end into your computer. You’ll see a device named MATRIXBOOT pop up like you would when you plug in a USB memory stick.
Download and install software
This is where we start to fiddle with things on the computer. It’s a lot of downloading files, dragging and dropping, and editing text files.
- You’ll start by downloading firmware for the chip and dragging it to the MATRIXBOOT. (I ran into some issues with downloading the firmware. You have to download an older version, 6.2 version, for this to work. This is different from the linked tutorial). Once you do so it will be renamed CIRCUITPY.
- Unzip the “lib” folder in CIRCUITPY.
- Drag and drop all the files from here into CIRCUITPY.
- After that, you should get a loading screen that looks like Metro’s digital displays.
Configuration
Now we’ll set it up for your particular station.
- You’ll need to sign up for an account and get a WMATA API key from the transit agency’s developer website. Sign up for a default tier subscription, then go to your profile, find the “primary key,” show it and then copy that string of numbers and letters. This API key is what lets your board talk to Metro’s systems and relay the information.
- Open the config.py file from CIRCUITPY volume. This should open in a Text Edit or Notepad editor.
- Fill in your WiFi name and password under the Network Configuration section. Be sure to maintain the single quote marks around your entry.
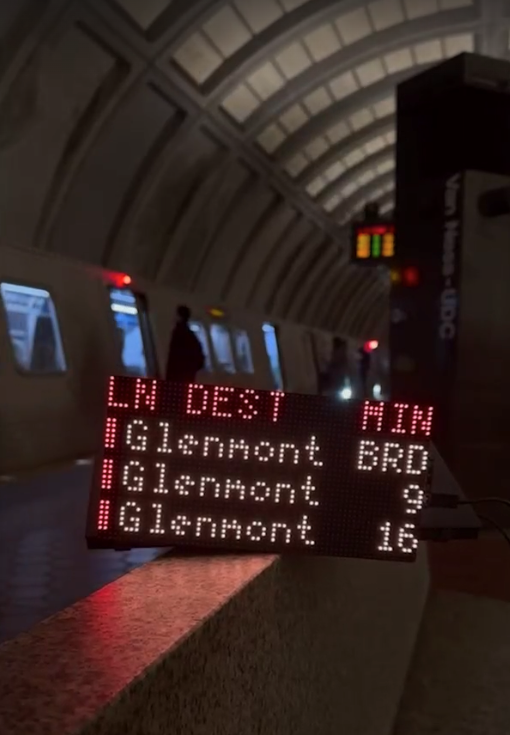
- Select your station and lines. Find your station code here. Enter that number in the Metro Station Code section. For our example, of the Van Ness station on the Red Line, we entered ‘A06’.
- You’ll also need a train direction code for “Train Group.” Unfortunately, this board can only show one direction at a time. Find the direction you need and enter it into the “train group” slot. Our number for Glenmont-bound trains was ‘1’.
- Copy and paste your API key from Metro’s developer website and enter it in the Metro API Key section.
- Hit save and your board should reboot with a little flamingo and then a loading screen and finally display the proper times after about 20 seconds.
- If you ever take the board to a different location, you’ll have to plug it back into a computer and enter in the Wi-Fi and password there, plus the correct station code and direction.
Now a few caveats.
The board refreshes its feed every five seconds. I’ve found that it is mostly accurate. At times, one of the trains can be just a minute off. For instance, as I write this, Metro’s official feed says the next three trains pulling into Van Ness station are 1 minute, 9 minutes, and 16 minutes away, while the mini board shows 1 minute, 10 minutes, and 16 minutes. I’m not sure why and it usually corrects itself, but I’ve built in an extra minute while relying on the board just in case.
As I noted above, the board freezes occasionally. Again, a known issue that people can’t seem to figure out why. The workaround that I use: plug the power into a Wi-Fi-enable smart plug (which I also use around the house for lamps and other things) and program it to turn it off and back on every four hours or so. That helps avoids the freezing, which seems to occur after it’s been on for a long time.
While we used a different version, Schneider said he’s had several people copy his board with success.
“The community around Metro is just very cool,” he said. “There’s a lot of people get really into it, so I’m just happy to be able to share (this project) with some other folks who are like-minded.
“Many people have already reached out, and it always puts a smile on my face just knowing that someone else is interested in working with this and building one of their own.”